Smartphone usage has increased manifold upon the introduction of Google’s Android. Since its introduction, Android has evolved at an outstanding pace in terms of application development, commercialization, and market share of Android-powered devices. Although originally developed for smartphones, now the embedded system industry has realized the capabilities of the Android embedded system. Due to its open-source nature, rich user interface, wide range of connectivity, secure communication, data encryption, and multitasking, Android for embedded devices has become a preferred choice for various applications. Android OS is a mobile operating system used in tablets and smartphones but is no longer limited to these; its range now includes set-top boxes, IPTV, Google TV, In-Vehicle Infotainment systems, automotive instrument clusters, and many more. One major advantage of such integration is that an Android app can address the functionalities of all these devices powered by Android, eliminating the need for developers to write several applications for different embedded systems. These systems will also aid power management capabilities.
In the ever-evolving world of technology, diversity is key. ARM-based platforms have become increasingly popular due to their efficiency, versatility, and power-saving capabilities. If you’ve got an ARM platform and you’re eager to run Android on it, you’re in the right place.
git clone https://android.googlesource.com/kernel/common.git kernel
Configuration and Customization
Linux Reference kernel
Make sure that you have a working kernel and a Linux root filesystem, functional on your board, i.e. you can boot to a GNU/Linux graphical environment.
The .config file of the Reference kernel will be used as a base for the Merged kernel. Keep a copy of this as a reference for later use.
You need a kernel (Retrieve kernel source code from above steps) that boots and provides to the system all the appropriate support required for a windowing system (e.g. graphics drivers for the framebuffer or your graphics chip) as a reference point. This will be called your Reference kernel.
For this article, we assume that you have a 5.10-based functional Reference kernel for your board. You may use any kernel revision you wish, but keep in mind that it may result in deviating from the information in this article.
Android kernel
Find an Android kernel which has the same revision as your Reference kernel. If it is not possible, use a revision that is closest, as this will simplify the procedure.
Merge Android Kernel Changes
In this step you can either obtain the Android patches from the Android kernel source or use git to merge the two kernel trees using their common point in time.
- The expected size of the patch is about 2MB. To extract the patches, find the point in time (using “git log”) where the Mainline kernel was imported to the Android kernel source tree.
- Go to the top level of the Android kernel source tree and run:
					git log --pretty=oneline --format="%Cgreen%h %Creset%s" \
                    	--grep="Linux 5.10" -n 20
- which will generate 20 one-line log entries that have the expression “Linux 5.10” in the subject or in the commit message.
- Since you need the patches to be on top of 5.1 Mainline kernel release, run the following command:
git diff <commit id> HEAD > X.Y.Z-Android.patch
- This gives you a patch file (named X.Y.Z-Android.patch) containing the changes to be merged. Check for merging conflicts, before attempting to perform the actual merge, by running:
git apply --test [path/to/X.Y.Z-Android.patch]
- which produces a list of merging conflicts (if any). Make sure that you resolve these conflicts and that the patch applies cleanly to your tree before you continue.
Build the Merged kernel
- Build the Merged kernel with:
make ARCH=arm CROSS_COMPILE=[path-to-arm-gcc] uImage
- which will produce a kernel Image, uImage and zImage in arch/arm/boot directory in the Merged kernel source tree. Replace the [path-to-arm-gcc] with the path to the latest version of Linaro or CodeSourceryARM toolchain that you have installed
Add a device in AOSP
Device directory from top level with vendor_prodcut.mk file
Getting stuck porting Android to your ARM platform?

Understanding the Basics
What is an ARM Platform?
ARM, which stands for Advanced RISC Machines, is a type of processor architecture known for its energy efficiency and wide usage in mobile devices, IoT devices, and embedded systems. ARM processors can be found in smartphones, tablets, and a wide array of other gadgets.
What is Android?
Android is an open-source operating system designed primarily for mobile devices but adaptable for a variety of platforms. It’s built on the Linux kernel and is known for its user-friendly interface, vast app ecosystem, and flexibility.
To start with the software component understanding plays a crucial role:
- Android open source project from google (AOSP)
- Linux kernel from SOC vendor
- Android HAL, Android framework, manifest files, Git, Repo tool
- Android specific patches from Android kernel for android-ism
- Understanding of Makefile, Android.mk, Android.bp, HAL, AIDL, SEPolicy, Linux kernel, Device tree, Android build system, hardware knowledge
While developing the Android operating system, a few improvements were revealed to the Linux kernel, along with an alerting driver, energy governance, Android common storage driver, kernel analyser, and logger. Several enhancements were made on top of the plain Linux kernel.
Android vs Linux
1. Android kernel vs Linux kernel
- Android – Google maintained/staging kernel, patches are released from google
- Linux – Linux mainline kernel
2. C runtime libraries
- Android – bionic
- Linux – glibc
3. HAL layers analogy of Android vs in Linux framework
- In Android – Audio HAL/policy – gstreamer, pcm, aplay framework in Linux
- In Android -Sensors HAL – IIo, sysfs in Linux
- In Android – Camera HAL – Gstremaer, v4l2-ctl in linux
- In Anroid – Gralloc, Hwcompositer – weston (wayland) openGL(GPU) compositer in Linux
- In Android – WiFi/BT HAL – conmanctrl, bluetooth in Linux
- In Android – RIL (modem) telephoney – ofno In Linux
4. Hardware and device support
- Android – mobile and embedded devices, with specific hardware support for touchscreens, sensors, and mobile chipsets.
- Linux – used on a wide range of devices, from servers and desktops to embedded systems and IoT devices.
5. Userland
- Userspace deamon not available in Android- udev, init Instead ueventd, init.rc
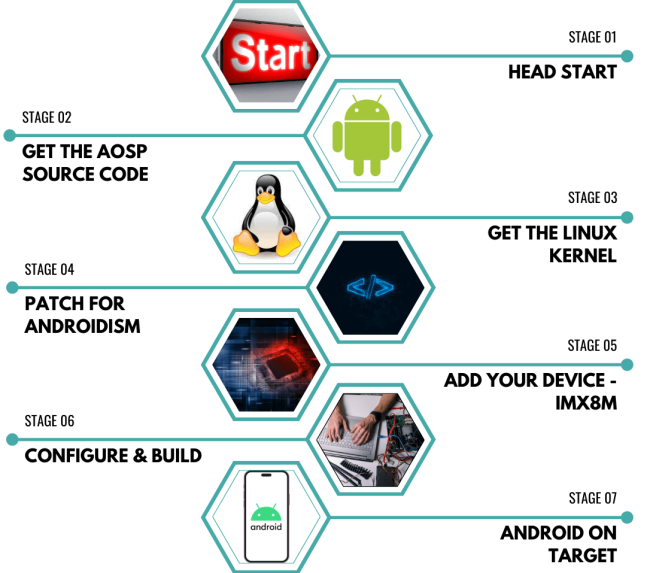
Preparation: Prerequisites and Tools, let the journey begin
Before you start porting Android to your ARM platform, you need to have a few things in place:
Setting up your development Environment
- A Linux-based system (Ubuntu)
- Ample disk space (around 150GB or more)
- A high-performance CPU
- Sufficient RAM (16GB or more recommended)
- Embedded hardware with >= 2 GIB of DDR
Downloading the Android Source Code
- Get the Android source code by following the official Android Open-Source Project (AOSP) documentation. From google – https://android.googlesource.com/platform/manifest with tag and branch
- Retrieving the kernel source code
Each build target defines the configuration of the ARM based SoC/board and selects which sources should be built for Android.
Need expert help with Android on ARM porting, kernel support, or BSP development?
[android_root]/device
- Add AndroidProducts.mk and provide LUNCH menu in COMMON_LUNCH_CHOICES and board mk file path in PRODUCT_MAKEFILES
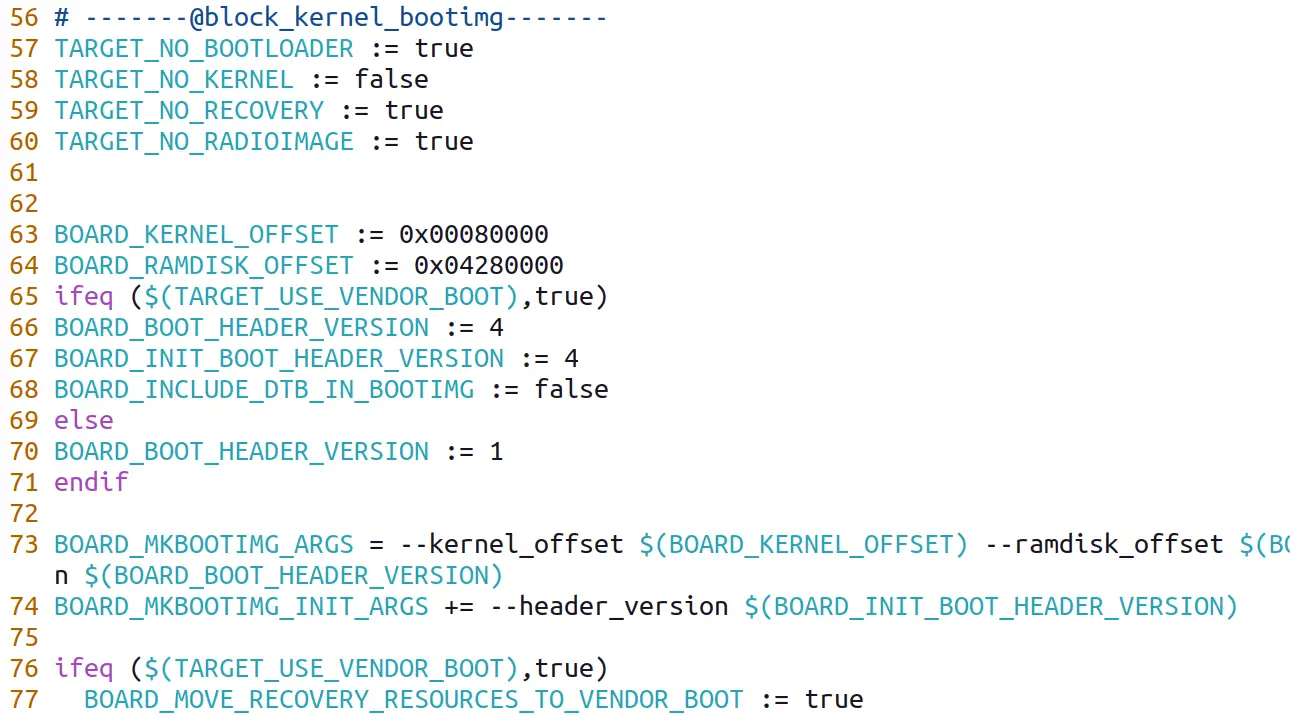
- Add BoardConfigCommon.mk and config arch type, peripherals block (camera, bluetooth, GPU, ISP, IMU), system partition size, kernel offset, mkbootimg config, filesystem type etc
- Add ProductConfigCommon.mk for package required for RIL, Audio, GPU, Display, touchpad mapping file, system apps, health monitor service etc into android define macros
Build Android for your SoC
- Build the Android filesystem for one of your added targets, by going to the top directory of the Android source tree, and entering:
make PRODUCT-[PRODUCT_NAME]-eng
- After some time, and if everything was set up correctly, you will get the Android root filesystem and a compressed version of it at:
[android_root]/out/target/product/[product_name]
- Configure your root file system and then Load the kernel on your board, and set the appropriate boot arguments in order boot successfully.
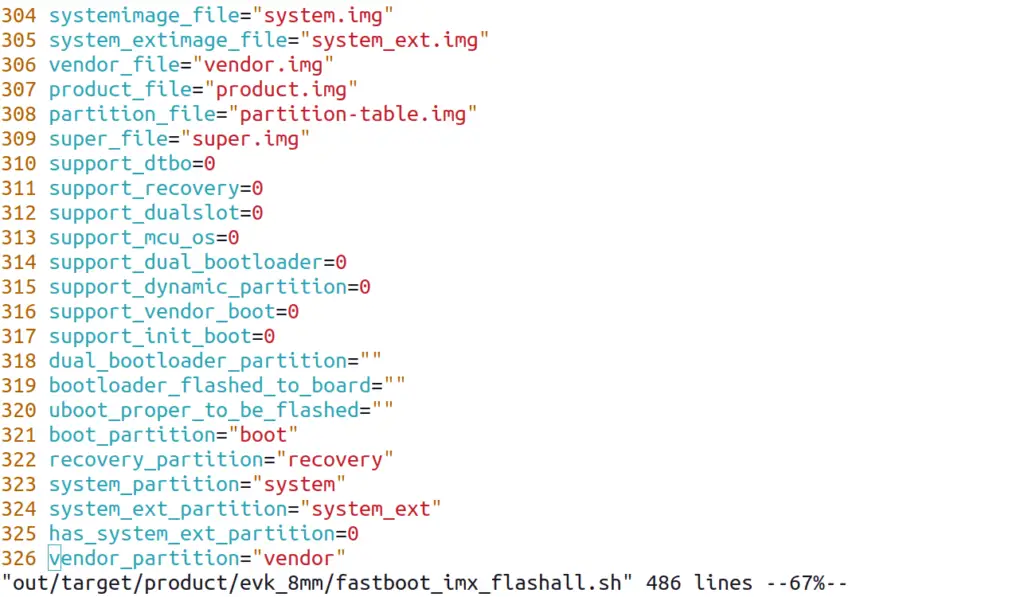
- Once it gets build flash the imges using fastboot protocol using fastboot_<Product>_flashall.sh from out/target/product/PRODUCT-N/
Debug Tip
- First and formost start the Android debug bridge (ADB) and Linux kernel UART for dmesg logs
					adb logcat -  adb logcat -v time –s
adb logcat –b crash
dmesg
- If display is not appearing start with visor or scrcpy
- Check the packagemanager, actvity manager and service using adb logcat
					adb shell 'pm list packages -f'
adb shell am monitor
You can be a friend with dumpsys
- Hangs on boot animation,
- Check for the SEpolicy or hardware has enough DDR
- Try enginering build or disable SEpolicy for initial boot
- Issue in flashing
- Check the device rooting and bootloader locking state
- Display not appearing
- Parhaps from Linux kernel check the device tree for DSI, LVDS configurations
Summing Up
Android porting on ARM boards is a complex undertaking. This article provides a foundational understanding of the process, but be prepared to invest significant time, effort, and continuous learning to successfully conquer this challenge. Embrace the journey, utilize available resources, and enjoy the rewarding experience of running your customized Android environment on your ARM-based board!
