Checkout more: Our upstream contribution towards LineageOS (an Android-based operating system)
When venturing into Android-based system programming, it’s essential to understand the term called HAL.
So what is a HAL?
In the realm of embedded systems, there exists a crucial component known as the Hardware Abstraction Layer (HAL). This layer serves as a vital bridge between the hardware-specific drivers and the higher-level Java API framework utilized by applications on an Android device. Its primary function is to abstract the intricate hardware specifics, providing a simplified interface for both app developers and the Android framework.
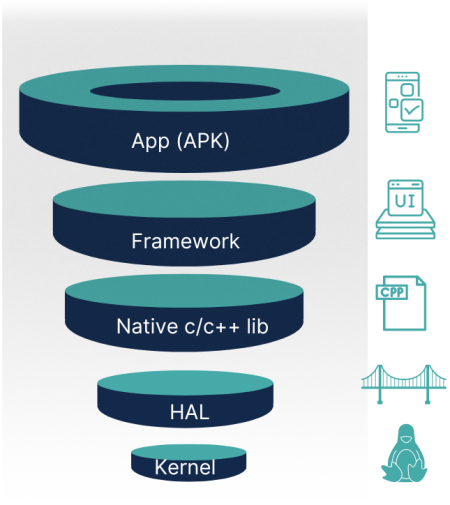
Consider the HAL as a mediator, linking the Android system with hardware devices. Positioned between them, it translates software commands into hardware language and vice versa.
Devices running Android 8.0 and above must support HALs written in the HAL Interface Definition Language (HIDL).
Android 11 also introduces support for HALs written in the Android Interface Definition Language (AIDL).
Why is Android HAL required?
The Android Hardware Abstraction Layer (HAL) acts as a crucial bridge between hardware and software. While Android applications communicate with hardware via Java APIs, Linux operates through system calls. HAL serves as the intermediary, enabling communication between Android frameworks and hardware drivers. Implemented in C/C++, HAL ensures compatibility and optimal performance within the Android ecosystem.
Exploring Android HAL, sensors, or platform-level system programming?
Android HAL Architecture
HAL typically exists as a .so file format and is loaded into the Android system at the opportune time.
There are distinct HALs tailored for various categories, such as the Audio HAL for handling sound-related tasks, Bluetooth HAL for managing Bluetooth connections, Camera HAL for camera-related functionalities, Sensor HAL for IMU-like sensor operations, and more. Understanding the hardware abstraction layer Android is essential, as it enables seamless communication between hardware components and the Android framework. Additionally, within the automotive realm, Android Automotive features a separate Vehicle HAL designed to address automotive-specific requirements.

Now, let’s delve into an example of implementing a sensor using Android HAL.
Reading Any Android Sensor Data with IIO
In the world of Android development, sensors play a crucial role. They allow us to monitor a device’s movements (3D orientation) and environmental changes (light, temperature, etc.). This guide dives deep into a powerful approach: using Industrial I/O (IIO) to directly access and read sensor data on Android with Linux.
This approach bypasses the standard Android framework and grants fine-grained control over sensor data acquisition.
Here’s what we’ll explore:
- Connecting various sensors to your Android board.
- Utilizing IIO to read sensor data directly from the Linux kernel.
By the end of this guide, you’ll be equipped to unlock the full potential of Android sensors and create unique sensor-driven applications.
How to read a sensor using a device driver?
This guide explores the method of reading sensor data using device drivers on Android. We’ll cover the basic steps:
- Identifying the sensor driver that supports sensors.
- Verifying your board’s kernel includes the driver.
- Enabling the sensor through the device tree.
- Reading sensor data directly from /sys.
The Industrial I/O (IIO) subsystem has become the go-to approach for interfacing sensors with Linux on Android devices. This modern framework offers a unified interface for accessing various sensors, located within the kernel directory Kernel/version-x.x.x/drivers/iio.
Before diving into the IIO system, let’s verify if it has a driver for your specific sensor. The best way to confirm this is by examining your Android board’s Kconfig file. This file acts as a configuration guide for the kernel build process.
However, even if the source code for the driver resides within the kernel, it’s possible your board’s pre-built kernel might not include it. If you encounter this scenario, you’ll have two options:
- Build a Custom Kernel: This approach offers full control but requires more technical expertise.
- Build a Custom Driver Module: This can be a less complex alternative but may not provide the same level of customization.
By checking the Kconfig file first, you can avoid the hassle of building custom components only to discover the driver wasn’t simply enabled.
Even though you found the sensor driver’s source code within the kernel, there’s another crucial step. We need to verify if your board’s specific kernel actually includes that driver during its build process.
Here’s why: Multiple sensor driver codes exist, and it’s impractical to compile and include every single one. Operating systems and Linux distributions must choose which drivers to integrate into their kernel builds.
To confirm compatibility, we’ll leverage the device tree. This next step involves configuring and enabling the sensor driver using the device tree, ensuring your board can utilize it.
After completing the process of enabling the sensor driver, the next step is to access the sensor data. Once the sensor driver is active, a new IIO (Industrial I/O) device is generated for it. These IIO devices reside in /sys/bus/iio/device, and each device is assigned a name like iio:device0, iio:device1, and so on.Interacting with these devices is straightforward as it involves using the filesystem.
Depending on the sensor, you may only receive raw data, with the logic embedded within the vendor Hardware Abstraction Layer (HAL). Understanding the sensor’s driver is crucial for accessing its data.
Android 8.0 and Beyond: A New Era for HAL
For devices running Android 8.0 and above, the internal software layers received a significant upgrade, adopting a more modular architecture. This new approach relies on Hardware Abstraction Layers (HALs) written in the HAL Interface Definition Language (HIDL). These HIDL HALs can be either binderized (for inter-process communication) or passthrough (for same-prod cess access).
Android 11 expands compatibility by adding support for HALs written in the older AIDL format, although these must still be binderized for communication.
Binderized HALs
In Android 8.0 and beyond, a new era of Hardware Abstraction Layers (HALs) emerged. These HALs, written in either HIDL (Hardware Interface Definition Language) or AIDL (Android Interface Definition Language), replaced the conventional and legacy HALs found in older versions. But what defines a Binderized HAL?
The key lies in communication. Binderized HALs leverage Binder IPC (Inter-Process Communication) to facilitate interaction between the Android framework and the HALs themselves. This method allows them to reside in separate processes, enhancing security and stability.
Here’s the takeaway: If your device runs Android 8.0 or later, it exclusively relies on Binderized HALs for communication between the framework and hardware components.
Passthrough HALs
Passthrough HALs, also known as HIDL-wrapped conventional or Legacy HALs, encapsulate existing HALs. They facilitate the HAL’s operation in both binderized and same-process (passthrough) modes. Devices transitioning to Android 8.0 can leverage passthrough HALs.
Legacy HALs
Legacy HALs, whether conventional or implemented as legacy, are usually constructed within shared library (.so) modules. Applications utilize these shared libraries to interact with the respective target device. However, starting from Android 8.0, neither conventional nor legacy HALs are supported. Despite its simplicity, this method of implementing a HAL library lacks a standardized interface.
Conventional HAL
Conventional HALs adhere to a particular named and versioned Application Binary Interface (ABI). To ensure consistent structuring of HALs, each hardware-specific HAL interface defines properties in hardware.h. This interface enables the Android system to consistently load the appropriate versions of HAL modules. The majority of Android system interfaces, such as sensors, are structured as conventional HALs, which are located under hardware/libhardware/include/hardware. A conventional HAL interface comprises two main components: modules and devices.
HAL modules
HAL modules are represented by the struct hw_module_t, which holds metadata such as version, name, and authorship details of the module. Android utilizes this metadata to accurately locate and load the HAL module.
hardware/libhardware/include/hardware/hardware.h
					typedef struct hw_module_t {
 uint32_t tag;
 uint16_t module_api_version;
 uint16_t hal_api_version;
 const char *id;
 const char *name;
 const char *author;
 struct hw_module_methods_t* methods;
 void* dso;
} hw_module_t;
tag must be initialized to HARDWARE_MODULE_TAG.
module_api_version denotes the API version of the implemented module. It is the responsibility of the module owner to update the version when there are changes in the module interface. The module API version should comprise major and minor components. As part of this feature, libhardware will introduce a hw_get_module_version() function. This function will accept supported versions as arguments and will be capable of rejecting modules with versions outside the provided range.
hal_api_version represents the API version of the HAL module interface. It serves as a means to version the structures and definitions of hw_module_t, hw_module_methods_t, and hw_device_t.
The ‘id’ serves as an identifier for a module, while the ‘name’ denotes the name of the module.
The hw_module_t struct includes a pointer to another struct called hw_module_methods_t. This struct contains a pointer to an open function for the module. The purpose of this open function is to establish communication with the hardware, for which the HAL is acting as an abstraction.
hardware/libhardware/include/hardware/hardware.h
					typedef struct hw_module_methods_t {
 int (*open)(const struct hw_module_t* module, const char* id,
 struct hw_device_t** device);
} hw_module_methods_t;
Typically, each hardware-specific HAL extends the generic hw_module_t struct by incorporating additional information tailored for that specific hardware component. For instance, this extension may involve adding functions such as read and write. This customization is implemented in files located at hardware/libhardware/include/hardware/hardware.h.
					typedef struct custom_module {
 hw_module_t common;
 int (*read)(void);
 int (*write)(int data);
} custom_module_t;
When implementing a HAL and crafting the module struct, it’s essential to designate it as HAL_MODULE_INFO_SYM and complete all the fields accordingly.
					struct my_module HAL_MODULE_INFO_SYM = {
 .common = {
 .tag = HARDWARE_MODULE_TAG,
 .module_api_version = 1,
 .hal_api_version = 0,
 .id = MY_MODULE_ID,
 .name = "Custom Module",
 .author = "Silicon Signals",
 .methods = &custom_hw_module_methods,
 },
};
Facing challenges with Android HAL development or sensor integration on custom hardware?
HAL device
A device is embodied by the hw_device_t struct. Similar to modules, each type of device delineates a refined version of the generic hw_device_t. This refined version incorporates function pointers tailored to specific features of the hardware.
hardware/libhardware/include/hardware/hardware.h
					typedef struct hw_device_t {
 uint32_t tag; // must be init to HARDWARE_DEVICE_TAG
 uint32_t version;
 struct hw_module_t* module;
 /** Close this device */
 int (*close)(struct hw_device_t* device);
} hw_device_t;
typedef struct my_device {
 struct hw_device_t common;
 uint32_t (*get_id)();
} my_device_t;
Access to HAL
Accessing HAL implementations involves building them into modules (*.so files) that are dynamically linked by Android as needed.
To create your module, you’ll need to generate Android.bp or Android.mk files for each of your HAL implementations and specify the paths to your source files. It’s crucial to name your shared library in a specific format to ensure they are located and loaded correctly.
To access a HAL library using the libhardware library, you can initiate it by following these steps:
- Utilize hw_get_module(char* id, struct hw_module_t ** module) to obtain a pointer directed towards the intended module.
- Call the module->common.methods->open() function to retrieve a pointer aimed at the intended device.
- Use the device pointer to execute specific functions tailored to the target, such as read() or write().
Sensor HAL
The Sensor HAL serves as the intermediary between the Android sensor framework and the device sensor. It outlines the functions that need implementation to enable the framework to manage the sensor.
The Sensor AIDL HAL is introduced in Android 13 and above, catering to both new devices and upgraded ones.
The sequence of calls in the Sensor HAL is as follows:
- Upon boot-up of the device, the get_sensors_list function is called.
- When a sensor is activated, the batch() function is called with the requested parameters, followed by activate(…, enable=1). Note that in HAL version 1_0, the order was reversed: activate was called first, followed by set_delay.
- If the characteristics of an activated sensor change, the batch() function is called.
- The flush() function can be called at any time, including on non-activated sensors, in which case it must return -EINVAL.
- Upon deactivation of a sensor, activate(…, enable=0) is called.
Initializing the HAL
Before using the Sensor HAL, it must be initialized by the Android sensor framework. This initialization process involves the framework calling the initialize() function, through which parameters are provided to the sensor.
Listing available sensors
To retrieve a comprehensive list of all static sensors available on the device, utilize the getSensorsList() function. This function furnishes a collection of sensors, each identified uniquely by its handle.
Configuring sensors
Setting up sensors requires configuration before activation. This involves specifying a sampling period and maximum reporting latency using the batch() function. Sensors should be capable of reconfiguration at any point using batch(), without losing sensor data.
Bottom Line
In the realm of Android development, sensors play a pivotal role, enabling us to monitor device movements and environmental changes effectively. This guide delves into a potent method: employing Industrial I/O (IIO) to directly access and read sensor data on Android with Linux. This approach circumvents the standard Android framework, granting precise control over sensor data acquisition.
