Introduction
From the outside, camera engineering looks easy, but once you get inside, it’s very hard. A camera module isn’t just a lens stuck to a sensor. It is a tightly linked system of optics, silicon, mechanics, electronics, and software that all work together in microns and milliseconds.
Here’s the deal. When camera programs don’t work in production, it’s usually not because of one big mistake. They fail because of small choices made early on, when the requirements were unclear, the trade-offs were not understood, or the realities of manufacturing were not taken into account.
This guide goes through the process of designing and building cameras, from coming up with the idea to making them in large quantities, from the point of view of a company that designs cameras. It is for product owners, engineering leaders, and decision-makers who want to avoid surprises after EVT and get more predictable results at scale.
To put this conversation in context, think about this. A Statista industry report from 2024 says that the global camera module market will reach over USD 90 billion by the end of the decade, thanks mostly to automotive, industrial vision, and smart devices. That growth isn’t coming from side projects. It comes from doing production-grade camera engineering the right way.
Camera Engineering Starts Before the First CAD File
Lenses and sensors are not the first things that come to mind when you think of camera engineering. It begins with clarity.
Teams need to know what problem the camera is solving and what limitations it has to work under before they choose any parts. A consumer action camera, an in-cabin automotive camera, and an industrial inspection camera may all use the same sensors, but they are built with different goals in mind.
This early thinking defines everything that follows, from optical stack choices to thermal design to software complexity.
Research and Development in Camera Engineering
Understanding
The R&D phase is about turning what a business wants into what engineers can do. This means knowing how the camera will really be used, not just how it is shown in a slide deck.
Some important questions are how far away the object is, how the lighting changes, how much movement is in the scene, how much exposure to the environment there is, and how long the object is expected to last. A camera made for a factory floor works very differently than one that is mounted inside a car or outside on a pole.
When teams don’t see these facts, they end up making up for them later by tuning ISPs more aggressively, raising the BOM cost, or making mechanical compromises.
Planning a camera-based product?
Defining Technical Requirements
When the use case is clear, camera engineering becomes managing constraints. Different things, like sensor resolution, pixel size, frame rate, lens field of view, depth of field, power budget, and interface bandwidth, all pull in different directions.
This really means that every camera design has its pros and cons. Higher resolution puts more strain on storage and bandwidth. A wider field of view makes distortion worse. Smaller pixels make things look worse in low light.
Good research and development doesn’t just look at numbers on a spec sheet. It weighs them against how easy they are to make and how stable they will be in the long run.
Prototyping With Intent
It’s not about getting everything right with early prototypes. They are about getting smarter. Engineering samples help check the accuracy of optical paths, mechanical tolerances, sensor behavior, and ISP pipelines.
At this point, camera engineering teams with a lot of experience purposefully add test hooks to the system. They want to see how sensor noise, MTF behavior, thermal drift, and alignment sensitivity work. These insights stop painful redesigns from happening later.
Performance Testing
Before moving on to detailed design, first models must be tested against real-world performance standards. This includes things like the quality of the image, the delay, the heat behavior, and the basic reliability.
It’s cheap to catch problems here. Catching them after tooling is not.

Design and Planning Turn Ideas Into Manufactural Reality
System-Level Camera Architecture
The first step in design is to plan out the whole camera system. This includes the optical stack, where the sensors go, the limits on the PCB layout, the mechanical housing, and the strategy for connectors.
In camera design services, this is the most important phase for coordination. You can’t design optics, electronics, mechanics, or software on their own.
Mechanical and Optical Co-Design
The height of the lens stack, the position of the sensor, and the tolerances of the housing all depend on each other. A slight adjustment in mechanical depth can cause the lens to go out of focus or create shading in the corners.
People use 3D modeling tools like AutoCAD and SolidWorks not only to see things, but also to model how parts fit together and how tolerances build up.
Planning the Production Flow Early
It can be hard to put together a design that looks good on screen. When designing and planning, you need to think about how parts will be handled, lined up, attached, and tested on a production line.
This is where engineering for enterprise cameras is different from making prototypes in a lab. We ask ourselves, “Can this be built 100,000 times with the same quality?” for every design choice we make.
Material and Component Sourcing
Selecting the Right Sensor and Lens Partners
More than any other part, sensors and lenses determine the quality of an image. But performance isn’t the only thing that matters. Availability, lifecycle support, and batch consistency are also very important.
Enterprise camera programs prefer suppliers who have proven process control and long-term plans, not just attractive datasheets.
Sample Validation Before Commitment
It’s not a formality to ask for samples. It is necessary to test sensors and lenses to see if they are different between batches. If a supplier doesn’t have good process control, two lenses with the same part number can act very differently when it comes to optics.
Locking Down Supply Chain Agreements
It’s very important to have clear agreements about quality metrics, delivery schedules, and how to let people know about changes. Changes to parts that weren’t planned for are a common reason why cameras fail late in the process.
Lens Sourcing
Optical Glass Formation and Shaping
Making lenses starts with shaping optical glass into exact shapes. Even tiny changes here can change how sharp or distorted something is.
Polishing and Surface Perfection
Polishing gets rid of flaws on the surface that scatter light. This step has a big impact on how contrast and flare work.
Optical Coatings and Their Impact
Protective and anti-reflective coatings make light pass through better and last longer. Uniformity of the coating is very important, especially for lens stacks with more than one element.
Inspection and Rejection Criteria
We check every lens for how clear it is, how well it fits, and how well the coating is. It’s better to reject marginal lenses early on to protect the overall yield later.
Struggling with camera performance or scaling issues?
Camera Module Assembly
Optical Alignment Between Lens and Sensor
This step sets the final quality of the image. For the focus to be consistent across the frame, the lens and sensor must be perfectly aligned.
Mechanical Stability Checks
Even if everything is perfectly aligned, it doesn’t matter if it can’t handle vibration, shock, or changes in temperature.
Early Module-Level Validation
Before moving on, the modules are tested to make sure that the electrical and optical parts work together as a whole.
PCB Assembly Controls the Camera’s Brain
Component Placement and Soldering
The ISP, power management, memory, and interfaces are all on the PCB. The placement of components has an effect on the integrity of the signal, the behavior of EMI, and the thermal performance.
Connector Integration
Reliable connectors make sure that data and power flow steadily between the camera module and the host system.
Electrical Testing and Debug
We check to see if the boards work and are stable. Fixing problems with PCBs early stops them from getting worse later.
Camera Body
Structural Assembly
The housing protects the camera mechanically and controls how it interacts with its surroundings.
Internal Integration
The PCB, sensor, and lens mount are all held in place so they don’t move or get out of alignment over time.
Sealing and Inspection
Final inspections look for gaps, loose parts, and problems with the assembly that could make it less reliable.
Software Installation
Firmware and Driver Integration
Software makes hardware work. Drivers for sensors, tuning for ISPs, and interface protocols are set up and installed.
Image Signal Processing Tuning
The ISP settings are changed to find the right balance between noise reduction, sharpness, color accuracy, and dynamic range for the intended use case.
Feature Validation
We test the user interfaces, controls, and system features to make sure they work properly.
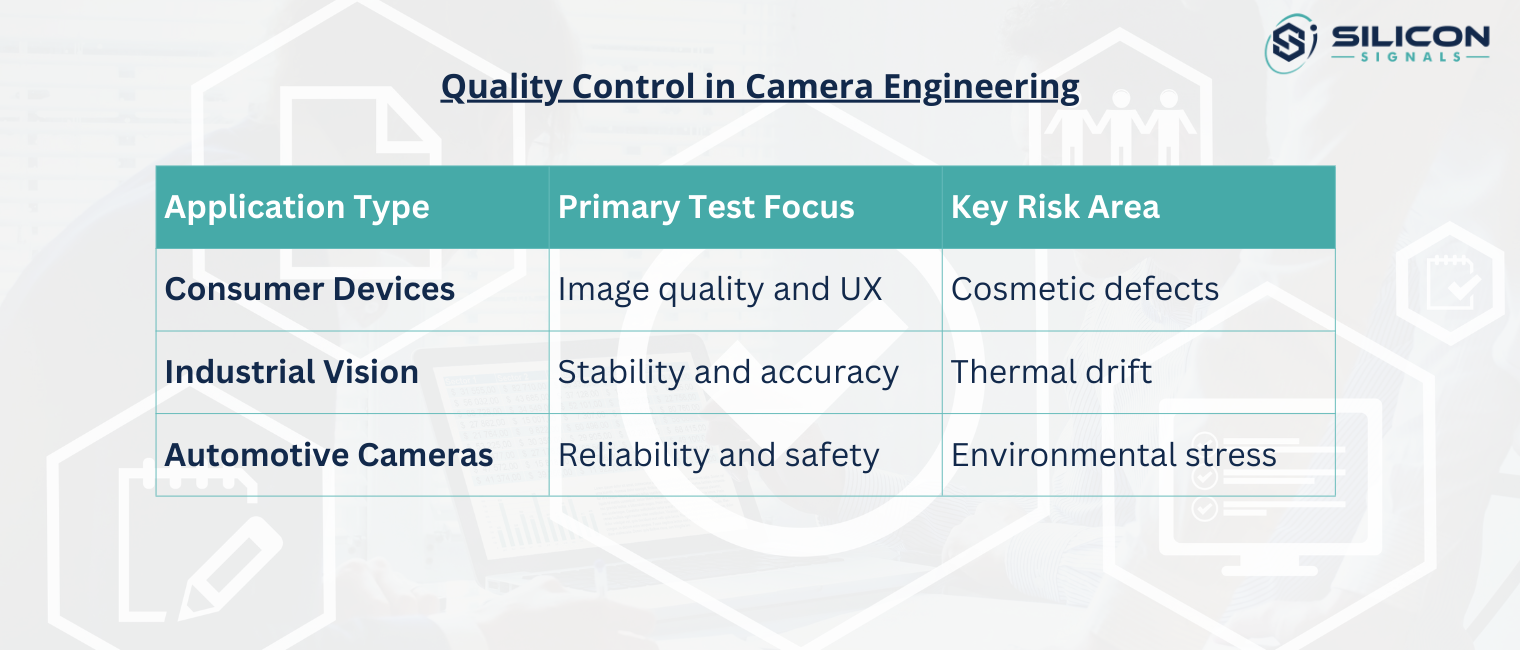
Quality Control in Camera Engineering
Testing Functionality in Different Conditions: We test cameras to see how well they take pictures, how well they focus, how long it takes for them to respond, and how stable they are.
Optical Performance Evaluation: Standardized test setups are used to measure resolution, color accuracy, distortion, and how well something works in low light.
Environmental and Reliability Testing: Tests that simulate real-world stress include temperature cycling, vibration, humidity, and drop tests.
The table below highlights how different testing focuses vary by application type.
Conclusion
To be a good camera engineer, you need to be precise, think ahead, and respect how things are made. The quality, reliability, and ability to grow of the final product are affected by every step, from the first research and development decisions to the last quality control.
Companies that see cameras as more than just things to sell should hire a team that knows how to design cameras from start to finish.
Silicon Signals believes that the problem with designing cameras is not just one part of the system, but the whole system. The goal is to make camera modules that can be easily made bigger and that work in the real world. This includes choosing sensors, designing optics, testing production, and providing long-term support. That’s how you can turn an idea for a camera into a product that you can support and that is ready to be made.
